Sunday 9 September 2012

time out

So taking a little time out today to make a hat ( I promised this one a while back and forgot bad me)

in the mean time enjoy this lovely picture.

Add caption

Saturday 8 September 2012

and we're making some progress.


I must learn how to set in sleeves better but this was just a test.

the skirt is just pinned on to get an idea of how to fit it and where it goes.


Collar also just resting on the uniform to give me an idea of how it might look.


Tuesday 4 September 2012

Builds 1 and 2 in pictures

laying out the newly cut pattern

the old build with the concept of a center opening under the flap

Bloody flap is TOO SMALL! grr arrgh. By this point I wanted to burn everything.

and it just didn't fit right because the seam placements were all off.

as you can see here, the princess seams were too far down and the main pack part was too wide.

small under the arm side pieces were just the wrong shape and too small.


layout number 2

the pieces are cut ( it's not all of them because I need to add some stuff but I wanted to put the basic build together just to see if it was worth messing further with.

Princess seams in the right place

right side out, I have to work on the actual sewing of this curve but it's a better start than before.

front side

side

side/back

back which fits him way better than it looks in the picture.

other side.


So today I have to figure out how to create the side pockets ( evenly no less) and set in sleeves and a lining and a collar. Then there's the bottom flaps. We've already worked out that the tunic top is about 2cm too short for his build but since this is a pattern we can work with this before I cut the end fabric.

It's a better fit over all, more snug with better lines, there will be facing and a  lining and all the finishing bits that make it look sharp but in order for em to go there I have to understand how to get there first. I used an old white sheet I had (I have many of these) in the hopes that if this works he could use this as an ISB jacket unofficially.

I will be pouring over every picture I can find online about how people make these to try and figure it out. I'm trying to be positive about it because I really want to make this work, but sometimes it's hard. I feel like a total noob.

Monday 3 September 2012

do or do not...

there is no try unless you are making a costume for the 1st time and don't have a clue what you are doing.

Today I scrapped the old build and began again. This time instead of drafting my own version I went back to the civil war coat and cut the pattern out, using the medium size not the large. I keep forgetting it's an American pattern so large is huge and medium fits my very tall but somewhat slender husband. I will have to adjust lengths but not widths.

I followed instructions and was über careful about the cutting process and lo and behold what I sewed together so far fits him, this we can work from.

I'll post pictures tomorrow and see how much further I get especially since I have to figure out how to do the code cylinder pockets. But let's just say right now I am happy, and I see some progress.

Saturday 1 September 2012

bah

so after another frustrating day of oh dear lord how the hell do I do this... I've decided to scrap the current build and start again because I've sewn and un-sewn the current one so often it's just a mess.

I'm slowly getting ther (maybe) but today well this week was not a good week. Tomorrow I will take some pictures so people can see the mistakes and then on Monday I will start again from ground zero.

in the mean time here is a nice picture of a totally unrelated costume. My generic tatooine garb.


Thursday 30 August 2012

the mountain comes to us...

Next year is going to be the mother of all years for Star Wars costume clubs as LFL brings StarWars Celebrations to Germany. This means new costumes so as of now I will be back at it, working hard on the officer's uniforms. New game plan and some good advice mean I think now I have the pattern to where I want it.

stay tuned.


and of course there will be more hats lots and lots of hats.

Friday 10 August 2012

still on summer break

but at least now I know we won't be moving anywhere any time soon which is great. I also got some much needed advice on the officer's uniform and after the crazy has died down I will be getting back to that. My poor long suffering husband who has been so patiently waiting.

Not much new really, the last hat I made ( just for me) sort of sucked but it was a quick and dirty replacement for mine which I ended up selling ( woot) I'll make more when the crazy dies down.

next adventure is Bayern park.

Friday 27 July 2012

summer break

on break for the summer although I did make a hat on the quick and dirty for the Serengeti event.

Sunday 10 June 2012

it's a mystery

In spite of using the same patterns for each size of hat they always come out utterly different than they should. What's up with this?

I think I need to start using seam guide thingy.

Friday 8 June 2012

no I don't have a problem...

I just bought 10 meters of black fabric for hats. Seriously... and I just finished off hat number 4 ( for possible sale)

*sigh* what on earth is wrong with me?

Sunday 3 June 2012

my equipment


This is my sewing machine. It's a Pfaff 360 and it's old. It doesn't have a lot of cool features but it's heavy and it has sewn an entire medieval heavy duck canvas pavilion. Getting add ons to fit her can be a bit tricky sometimes. I spend a lot of time on ebay looking for extras and replacement bits ( just in case). I don't own a serger ( Overlock) machine yet, though it's on the list of things I'd like. I'd also love a more modern machine that does embroidery but that's just a wish.

For now I am happy with my Pfaff which I found for 15- euros at a flea market.

Officer uniform

so now some pictures of where I am at with this.

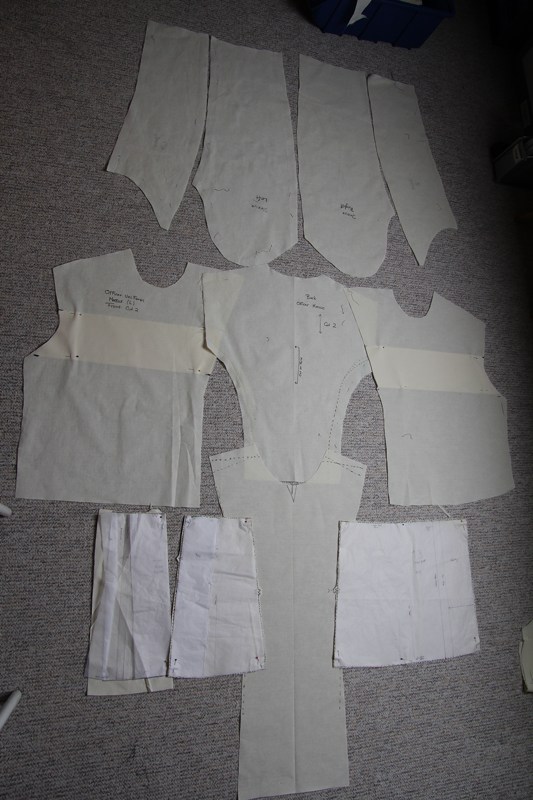
All of the pattern pieces laid out on the floor.

back
front

side with code cylinder pocket

code cylinder pocket


front with sleeves pinned

back with sleeves


mock collar added

The collar is just a strip of fabric, the real one hasn't been cut out yet which is why this looks crappy. It was mainly to get the idea of HOW it will look when put together.

I'm still having sleeve issues.

but now at least it actually fits him better.


the next challenge is to figure out how to attach a zip or snaps to make it all work.