In spite of using the same patterns for each size of hat they always come out utterly different than they should. What's up with this?
I think I need to start using seam guide thingy.
Sunday, 10 June 2012
Friday, 8 June 2012
no I don't have a problem...
I just bought 10 meters of black fabric for hats. Seriously... and I just finished off hat number 4 ( for possible sale)
*sigh* what on earth is wrong with me?
*sigh* what on earth is wrong with me?
Tuesday, 5 June 2012
Sunday, 3 June 2012
my equipment
This is my sewing machine. It's a Pfaff 360 and it's old. It doesn't have a lot of cool features but it's heavy and it has sewn an entire medieval heavy duck canvas pavilion. Getting add ons to fit her can be a bit tricky sometimes. I spend a lot of time on ebay looking for extras and replacement bits ( just in case). I don't own a serger ( Overlock) machine yet, though it's on the list of things I'd like. I'd also love a more modern machine that does embroidery but that's just a wish.
For now I am happy with my Pfaff which I found for 15- euros at a flea market.
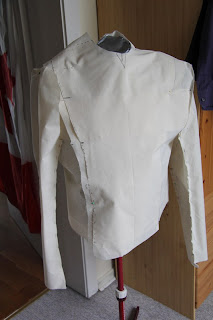
Officer uniform
so now some pictures of where I am at with this.
 |
| All of the pattern pieces laid out on the floor. |
 |
| back |
 |
| front |
 |
| side with code cylinder pocket |
 |
| code cylinder pocket |
 |
| front with sleeves pinned |
 |
| back with sleeves |
 |
| mock collar added |
 |
| The collar is just a strip of fabric, the real one hasn't been cut out yet which is why this looks crappy. It was mainly to get the idea of HOW it will look when put together. |
 |
| I'm still having sleeve issues. |
 |
| but now at least it actually fits him better. |
 |
| the next challenge is to figure out how to attach a zip or snaps to make it all work. |
little update.
So after getting a huge boost by hearing someone else out there is actually reading this blog ( yay) I realised it's been a while since I updated.
So this is where I am at.
hats - I'm getting the hang of the hats and I am photographing a step by step how I make them. Mostly it's fiddly but not too hard except for the stupid brim, that's a pain.
The Officer top: well I'm mostly there to having a finished pattern, the sleeves ares till giving me a bit of trouble and the next big hurdle is how to actually attach it all together ( zips or snaps) but right now, since there is just 2 weeks until Legoland DK I don't see me going too far. I have hats to make anyway.
so here are some hat making images:
As you can see it's quite a process. I have still to photograph the actual putting the last bits together, adding the brim which is a big pain in the rear and doing the finishing then adding the lining. But this gives you the basic idea of how the hat starts off. It should look like this when it's done.
So this is where I am at.
hats - I'm getting the hang of the hats and I am photographing a step by step how I make them. Mostly it's fiddly but not too hard except for the stupid brim, that's a pain.
The Officer top: well I'm mostly there to having a finished pattern, the sleeves ares till giving me a bit of trouble and the next big hurdle is how to actually attach it all together ( zips or snaps) but right now, since there is just 2 weeks until Legoland DK I don't see me going too far. I have hats to make anyway.
so here are some hat making images:
 |
| finished hats and unfinished hat pieces. |
 |
| stitching the stiffening to a side piece |
 |
| hat side pieces ( crown) sewn together now ironing out the seams. |
 |
| marking the middle ( makes it easier to add the hat top.) |
 |
| front / back flap, with stiff interfacing. |
 |
| snipping the curve so it will iron easier. |
 |
| turned right side out and ironed. |
 |
| the seams then get pinked. |
 |
| and once again ironed out. |
 |
| top stitched to finish the look. |
 |
| centre marked ( I do this by using an iron. |
 |
| two flaps done, the wrinkles get ironed out. |
 |
| making the hat brim |
 |
| pinking the seam |
 |
| the brim turned right side out |
 |
| this is what it looks like with the canvas duck and the interfacing both to make the brim stiff and not floppy. |
 |
| adding the deco lines. Imperial hats have either 5 or six. |
 |
| the finished brim. |
 |
| adding the top to the crown |
 |
| stitched and snipped ready to be turned right side out then sewn down. |
Subscribe to:
Comments (Atom)


